Binarysoft is Authorised Tally Sales & Implementation Partner in India

+91 742 877 9101 or E-mail: tally@binarysoft.com
Office Hours 10:00 am – 6: 00 pm , Mon-Fri

Digital Signature in TallyPrime for PDF Documents

Published on: 18-08-2022

The facility of digital signature in TallyPrime help you digitally sign and authenticate your documents with great ease. It secures your document from tampering, impersonation, and repudiation. This topic covers how to configure and add digital signature on PDF to share with concerned parties via Export, E-mail, and Print.


In your business, you must be sharing documents with your internal stakeholders, auditors, and customers with sign, stamp or letterhead of your organization. Moreover, you may be sharing an Invoice with your customer or Balance Sheet and Profit & Loss A/c with a chartered account for audit purposes. You must be providing Form-16 to your employees with signature and stamp of your organization. Digital signature in TallyPrime provide you with a convenient, efficient, and cost-effective way to share documents with the concerned people, while ensuring authenticity, integrity, and non-repudiation of the same. In addition to that, it also avoids impersonation and tampering of the document in transit, as any changes made in the document affect the digital signature. 

TallyPrime Release 2.1 supports dongle-based digital signature in PDF documents, and you can use the feature while sharing vouchers and reports with concerned parties. All you need is digital signature certificate (DSC) token or dongle issued from a Certifying Authority such as eMudhra, Capricon, Verasys, Safescrypt, Pantasign CA, (n)Code Solutions, and IDSign CA.

Moreover, anyone can use the facility of digital signature in TallyPrime, given that the DSC dongle should be connected to your computer or laptop.

The facility of digital signature in TallyPrime is provided for Export, E-mail, and Print. 

Configure Digital Signature

Irrespective of the mean of sharing – Export, E-mail, or Print, the process of configuring for digital signature is similar in TallyPrime. Moreover, the configuration is one-time, applicable to all the Companies that you load in TallyPrime. You have a flexibility to change the configuration at any point in time.

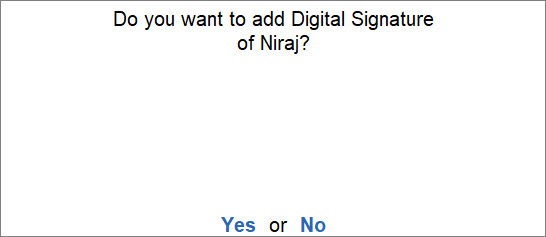
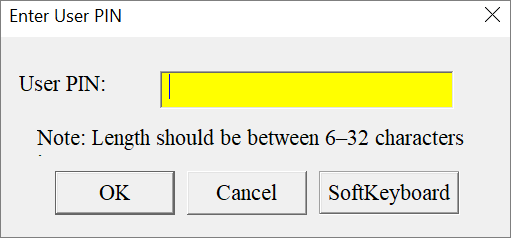
To configure for digital signature in TallyPrime, connect your digital signature dongle to your system and: 

  1. From any voucher or report, initiate Export, E-mail, or Print, as needed.
    1. Press Ctrl+E (Export).
    2. Press Ctrl+M (E-mail).
    3. Press Ctrl+P (Print).
  2. Select format/printer, as applicable.
    1. In case of Export and E-mail, select Format:
      1. Press F8 (File Format) in case of Export and E-mail.
        Alternatively, press C (Configure), type or select File Format and press Enter.
      2. List of File Formats: PDF (Read-only document).
        When you select PDF (Read-only document), digital signature configurations start appearing.
    2. In case of Print, press F6 (Printer) > select Microsoft Print to PDF and press Enter.
      Alternatively, press C (Configure) > type or select Microsoft Print to PDF and press Enter
      When you select Microsoft Print to PDF, digital signature configurations start appearing.
      The Microsoft Print to PDF option will only be available if you are using TallyPrime on Windows 10 or later versions.
  3. Select the digital signature. 
    1. In Digital Signature, select the signature from the List of Digital Signature Certificates.
    2. Ask before signingYes.
      Henceforth, when you export, e-mail, or print a document, TallyPrime will ask before adding digital signature to it.
      Set it as No if you want to add digital signature to all documents. 
    3. Format of Signature:
      1. Only Text to include only digital signature.
        Digital Signature in TallyPrime - Only Text
      2. Text & Image to add an image of your Company’s logo, stamp, your handwritten signature, or other such images.
        1. Image Path: specify/select the folder path on which the image is stored in your system.
        2. Image File Name: Select the image that you want to add.
        3. Include name of signatoryYes.
          When you set this as Yes, the name of signatory as shown in the image will become a part of the document along with the digital signature and image selected by you. 
          Digital Signature in TallyPrime - Text and Image

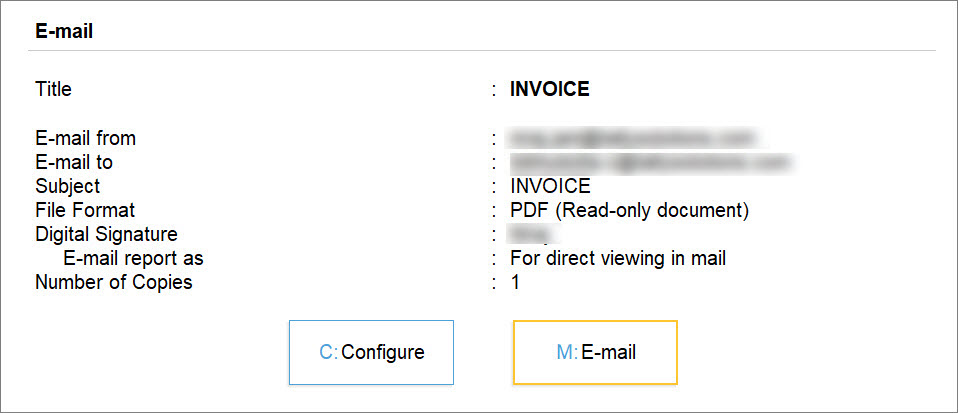
The E-mail Settings and Print Settings screens are similar with the details of digital signature.

Share Digitally Signed Documents

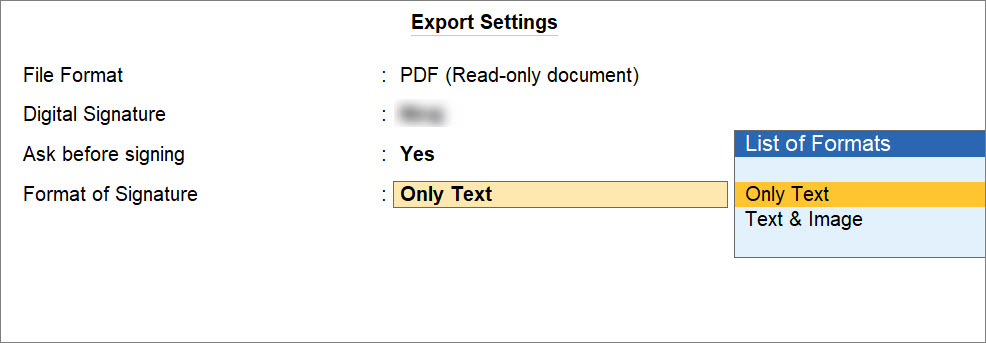
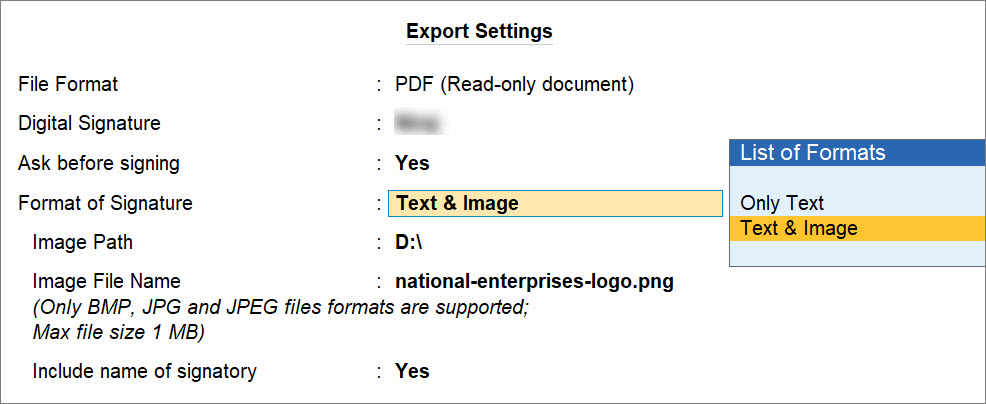
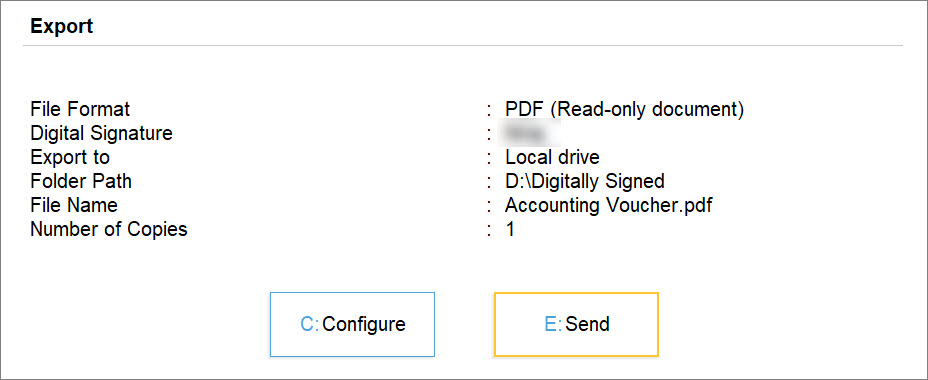
Once you configure digital signature, you can start signing the documents digitally and share with the concerned parties for various purposes through Export, E-mail, or Print, as needed. 

Export documents with digital signature

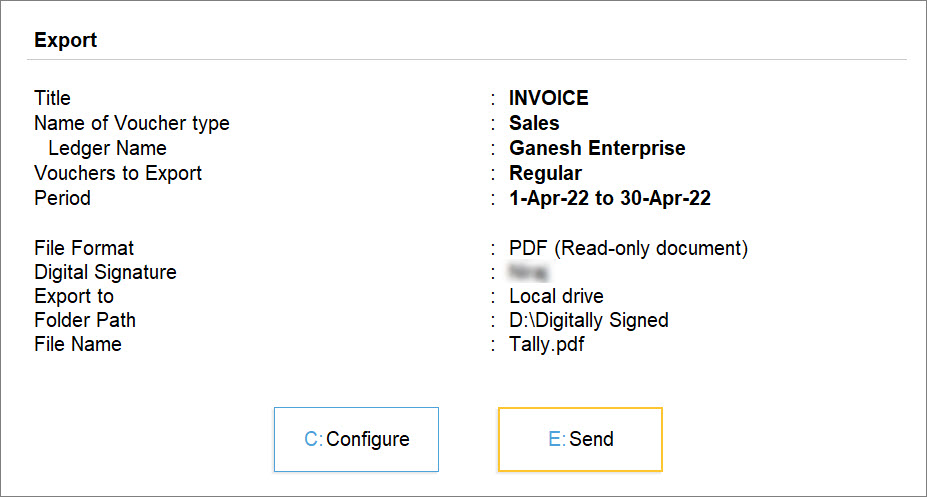
If you want to Export a digitally signed voucher or report, from the voucher or report:

  1. Press Ctrl+E (Export).
    The Export Settings screen appears with digital signature configured.
  2. Press Ctrl+A to save and proceed.
    You can change the digital signature, if you have a different dongle for which digital signature is not configured in TallyPrime.
  3. Press E (Send).
    Export with Digital Signature in TallyPrime
  4. Press Y (Yes) to add digital signature in the transaction/report, if you have set Ask before signing to Yes.
    Digital Signature Message in TallyPrime
    If you press (No), then the PDF will get exported without the digital signature. 
    The Enter User Pin screen appears, if you are using the digital signature for the first time after loading the Company and the dongle is connected to your computer.
    It is important to note that the appearance of the PIN prompt may vary based on digital signature you are using and the Certifying Authority that has provide you with the same.
  5. Enter the User PIN provided by the Certifying Authority and click OK.
    Enter User Pin for Digital Signature in TallyPrime
    Once you enter User PIN, you will not need to enter it again until you close TallyPrime or remove the digital signature dongle from your system. 

E-mail documents with digital signature

If you want to e-mail a digitally signed voucher or report, from the voucher or report:

  1. Press Ctrl+M (E-mail).
    The E-mail Settings screen appears with digital signature configured.
  2. Press Ctrl+A to save and proceed.
    You can change the digital signature, if you have a different dongle for which digital signature is not configured in TallyPrime.
  3. Press M (E-mail).
    E-mail with Digital Signature in TallyPrime
  4. Press Y (Yes) to add digital signature in the transaction/report, if you have set Ask before signing to Yes.
    If you press (No), then the PDF will be sent without the digital signature. 
    The Enter User Pin screen appears.
  5. Enter the User PIN provided by the Certifying Authority and click OK.
    Once you enter User PIN, you will not need to enter it again until you close TallyPrime.

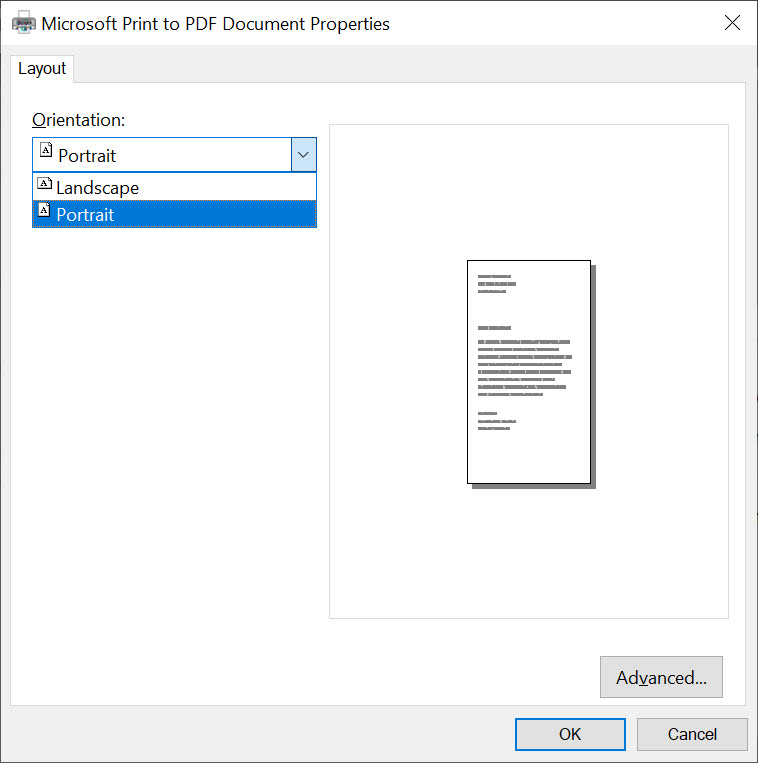
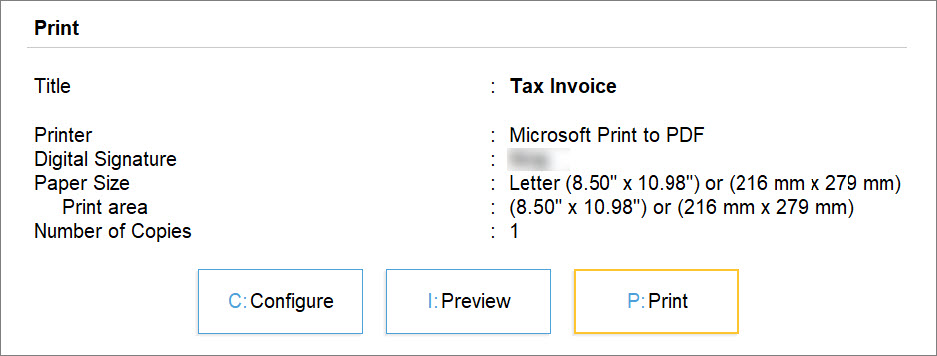
Save document to PDF while printing

If you want to save the digitally signed document as PDF, from the voucher or report:

  1. Press Ctrl+P (Print).
    The Printer Settings screen appears with digital signature configured.
  2. Press Ctrl+A to save and proceed.
    You can change the digital signature, if you have a different dongle for which digital signature is not configured in TallyPrime.
  3. Configure Microsoft Print to PDF, as required and click OK
    Save to PDF With Digital Signature in TallyPrime
  4. Press (Print).
    Save to PDF with Digital Signature in TallyPrime with Microsoft Print to PDF
  5. Press Y (Yes) to add digital signature in the transaction/report, if you have set Ask before signing to Yes.
    If you press (No), then the PDF will be saved without the digital signature. 
    The Enter User Pin screen appears.
  6. Enter the User PIN provided by the Certifying Authority and click OK.
    Once you enter User PIN, you will not need to enter it again until you close TallyPrime.

Click here to view a sample PDF documents with digital signature.

PDF Documents with Digital Signature

Irrespective of the mean – Export, E-mail, or Save to PDF – through which you share PDF documents with the concerned parties, TallyPrime allows you to add digital signature to vouchers and reports, including the multi-account reports. 

Voucher with digital signature

You may want to share an authenticated copy of an Invoice with your customer or a copy of finalised purchase order with your vendor. In such case, you can export, e-mail, or save documents to PDF with digital signature.

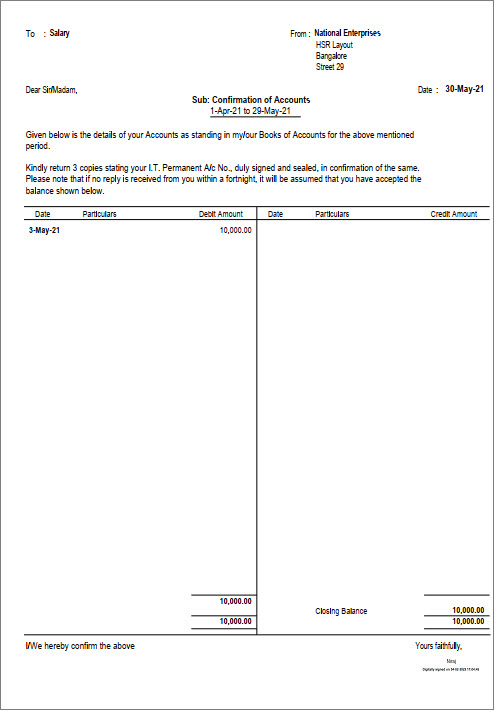
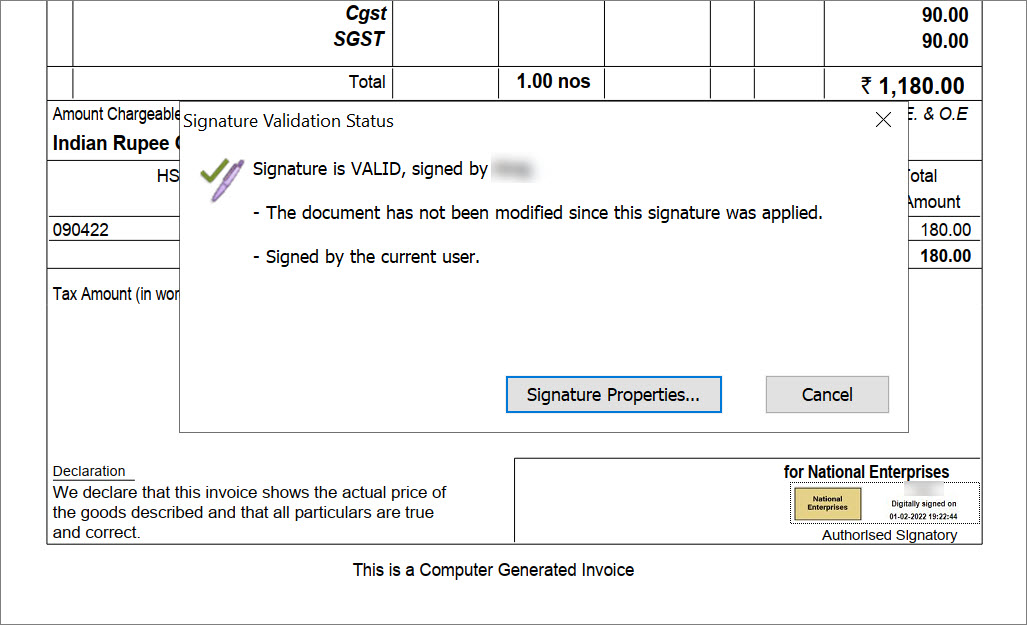
A sample voucher with the digital signature appears as shown below.

Voucher with Digital Signature in TallyPrime

The digital signature gets added with date and timestamp above the label Authorised Signatory.

Reports with digital signature

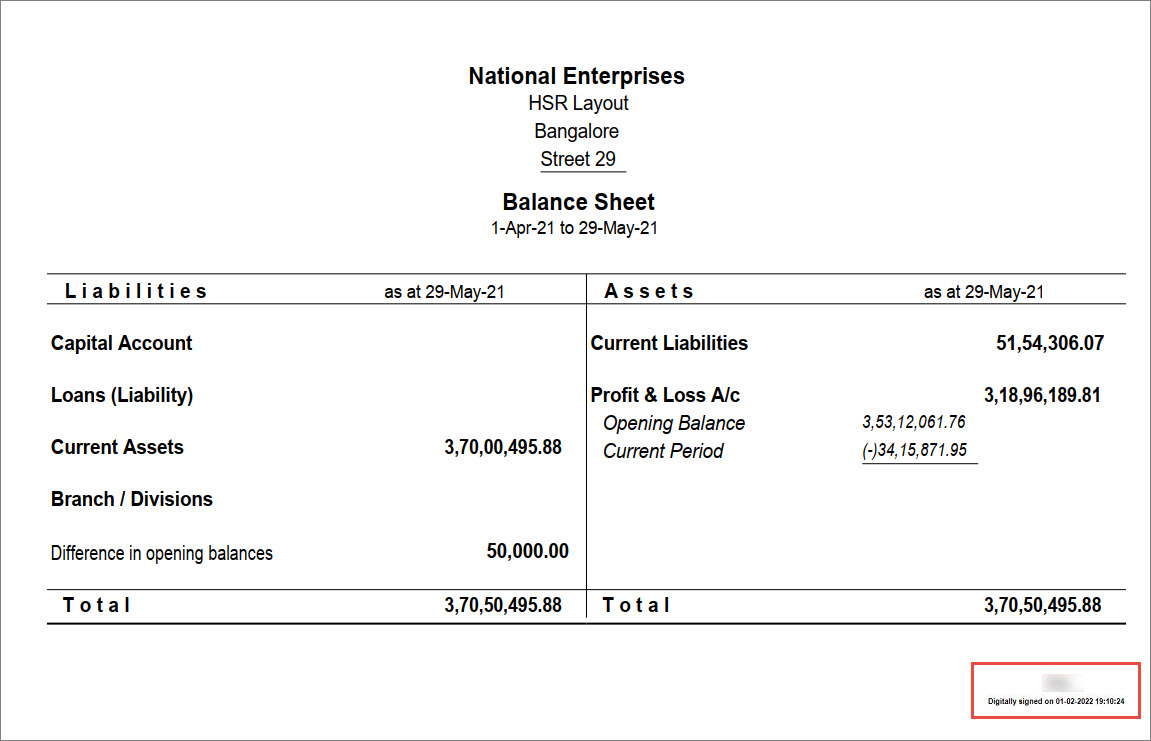
You may want to share Balance Sheet or Profit & Loss A/c with your chartered accountant or may want to share Form-16 with your employees. 

In reports, digital signature will be displayed along with the Yours Faithfully sign-off.

Confirmation of Accounts with Digital Signature in TallyPrime

If the reports do not have a sign-off, then the digital signature gets added at the end of the report as show below.

Balance Sheet with Digital Signature in TallyPrime

Add Digital Signature to Each Voucher in Multi-Voucher Reports

If you want to share Confirmation of Accounts with your chartered accountant or sales invoices created for a specific party over a period with digital signature, then you can do so with digital signature on each voucher in the report. 

  1. Press Alt+E (Export) > Others > press Enter > type or select Multi-Voucher and press Enter.
    The Export screen appears.
    Note: Press Alt+M for E-mail or Alt+P for Print, as needed, and then proceed to the next steps. 
  2. Press C to configure export of Multi-Voucher report for a ledger and period.
    To know how to do it, refer to the Multi-Voucher/Invoice for a select party section in the Print, Export, or E-mail Multi-Account Reports topic.
  3. Press F8 and configure for digital signature, if you have not configured already.
  4. Press E (Send).
    Add Digital Signature While Exporting Multi-Voucher Report for a Party and Period

Subsequently, the multi-voucher report with digital signature on each voucher will get exported as a single PDF.

Video Player


00:00

00:22


Similarly, you can add digital signature to each voucher while exporting, e-mailing, or printing any Multi Account Report to PDF.

Validate Digital Signature

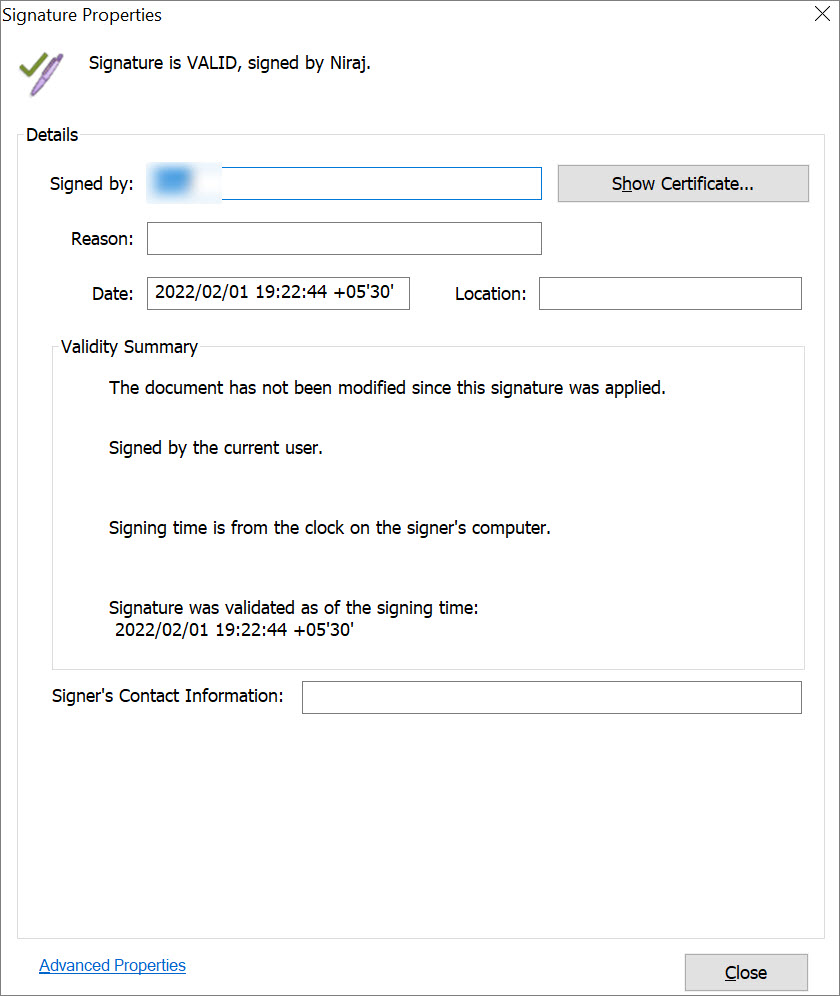
You may receive documents with digital signature such as an invoice from your supplier with digital signature. If you are a chartered accountant, then you may receive documents for audit from your client. In such cases, you can verify the digital signature on the document. 

Moreover, if you have exported a PDF document with a new digital signature, then you may want to verify the digital signature before sending it to the concerned party.

Tampering or altering a document impacts digital signature. For instance, if you split the digitally signed PDF of a transaction or report into multiple pages, then the digital signature added on it becomes invalid. 

Some PDF readers validate the digital signature when you open. However, the experience may vary, based on the PDF reader you are using.

To validate digital signature in a PDF document:

  1. Open the PDF document and click on the digital signature.
    You can see Signature Validation Status.
    Validating Digital SignatureIf the document was tampered, then the signature would show INVALID. 
  2. Click Signature Properties
    The Signature Properties window appears as shown below.
    After verifying the information in the Signature Properties window, click Close.
    Digital Signature Properties for Validation
  3. After verifying the information in the Signature Properties window, click Close.